Item Level Setup
Item levels are used to associate items with a Price Level. These price levels allow you to set alternative modifier prices and use them for as many items as you would like. These item levels can be activated for individual order Transaction Type by the technical support staff as there currently is no way to activate these prices within the customer interface
Example: you normally price the modifier (menu item 738) 'Add Bacon' at $.75 but would like to raise that to $1.00 for small pizzas and $1.50 for medium pizzas.
You would assign the levels 'SM Pizza' and 'MD Pizza' to the 'Add Bacon' modifier and give them the appropriate prices.
First setup any Name Levels by accessing the  button, select an empty row and enter the name of the levels you wish to add.
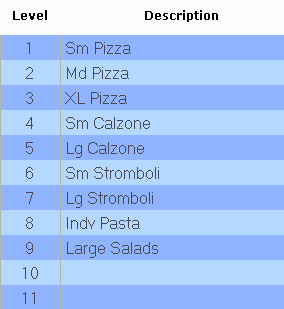
These name levels should correspond to your main item groups such as Pizza, Salad, sandwich etc.:
If you need to blank out a line you can use the  button located at the top of the screen.
After you have added the levels press the  button to go back to the Item Levels screen. Here you would select the menu item modifier 'Add Bacon' and under the column 'Price 1' add the prices for SM Pizza and MD Pizza:

Prices in the remaining columns 2 through 7 can be activated by technical support staff. These prices would allow you to have separate prices based on Transaction Type or by a schedule such as a "happy hour" pricing scheme. Each modifier in the menu can have a separate price for each Item Level so for example we setup SM Pizza on 'Add Bacon' at $1.00 but you can have SM Pizza 'Add Chicken' for $1.25. In this way each modifier only needs to be set up one time but can have a wide range of prices depending on which main item is being ordered.
 Note: make sure to assign the Item Level to your main items in the Item Manager 'Level' field