Setup Display
VDU setup is only available to PDQ POS support staff

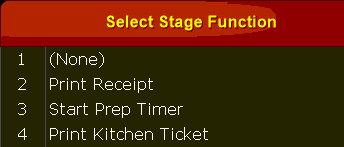
Use the  button to manage and configure your order 'stages'. Order Stages are essentially macros that perform a series of predetermined events when an order is bumped off of the videos.
Stages can perform such actions as: printing a receipt for an expediter, printing a ticket for the kitchen staff or starting a prep timer:

Select the stage (if any) to apply to this VDU:
The  button allows you configure default color styles for your VDUs:

|
Style Name: Set a friendly name that is easy for you to remember |
Grid Row Height: sets the height of the display grid on your monitor. determines how close the text and images are on your VDU |
Default\Alternating Back Color: set the background color for the tickets displayed on the VDU |
|
Font: choose the desired font and font size to display on the VDU |
Screen Back Color: configure the background color for the VDU. |
Default\Alternating Text Color: set the text color for the tickets displayed on the VDU |
You can also add a new style, edit an existing style or delete a style if it is no longer in use:

Using the  or
or  buttons allows you to either setup a new, or change and existing, VDU. Both add and modify screens are identical:

Under 'Add\Modify Display' the  tab is the default screen. On this screen you can set:
![]() Note: to change most of the listed options on this screen simply select the option with either your mouse or by touching the screen
Note: to change most of the listed options on this screen simply select the option with either your mouse or by touching the screen

- Display Name: Used to set a 'friendly' name for the video. This name is used on the VDU as an identifier.
- Station Name: Shows the name of the terminal that the VDU is running on. A terminal must be designated to run each VDU but terminals can run more than one VDU at a time.
- Style Name: displays the designated color and font style the VDU is using.
- Rows: shows the number of rows to display per order on the VDU (options are 1 or 2)
- Columns: select the number of columns per order to display on the VDU (options are 1 through 5)
- Route Position: allows you to set the position that the VDU holds in the system.
- For example: if an order is eligible to display on two (2) VDUs it will display on the one with the lower route number first: VDU with route #1 will receive the order and bump it to VDU with route #2. This allows you to move orders to new prep areas as needed.
- Bump Increment: sets the number of presses needed to bump an order.
- Pre-Prep Warning: configure the amount of time (in minutes) to change the color of an item on the VDU to warn that the timer is expiring.
- Post-Prep Warning: shows the amount of time after the timer has expired (in minutes) to begin alerting that the timer has expired.

|
Display is Active: toggle if display is active and usable or inactive and unusable |
Show Prep Time: determines if a counter showing prep time is visible or not |
Show Large Bump Numbers: when active uses a larger font size for the order number |
Show Alerts: determines if the VDU displays alert statuses or not such as prep time warnings |
Show Table Number: if active the table number for the order will display on the VDU. |
Show Cust name: when set to active the entered customer name will show on the VDU along with the order |
Use Transaction Priority: uses the transaction priority to sort (transaction types tab) |
|
Display is Touchscreen: When set to true (Green) the display is designated as a touchscreen and orders can be bumped by touching the screen directly |
Show Bump Status: toggle to either show that an item has been bumped from anther VDU or not |
Combine Transactions by Order: if set to active items will be grouped by order. If not active items will group by type |
Quick Bump Prep Time: when set to active you are able to bump prep time messages from the screen with a single press |
Show Staff name: determines if the staff name of the order taker displays or not |
Show Cust Zone: when active the customer delivery zone will display along with the order |
Bump Item: when active individual items can be bumped from the VDU. when inactive users can only bump entire orders |
Use the ![]() button to determine what menu groups and menu items are displayed on the VDU:
button to determine what menu groups and menu items are displayed on the VDU:

Select either an entire Menu Group or choose from the list of Menu Items and use the red arrows to move them to the VDU for display.
Once the Group or Item is selected for display on the VDU select it by clicking on the list of numbers ![]() .
.
This will bring up the Transaction Type Editor where you can choose which order Transaction Type should display on the VDU for the selected item or group:

You can also use the ![]() button to set available transaction types for the VDU globally as well as setting the sort order (the order the Transaction Type will appear on the VDU)
button to set available transaction types for the VDU globally as well as setting the sort order (the order the Transaction Type will appear on the VDU)

The ![]() button allows you to set the stages that occur when bumping an order. Each bump of the order will initiate the next stage.
button allows you to set the stages that occur when bumping an order. Each bump of the order will initiate the next stage.
In the example below:
1) first bump will print a receipt
2) second bump will start the timers for any item that has a time on the order

Selecting the  button gives you the ability to program your bump bar:
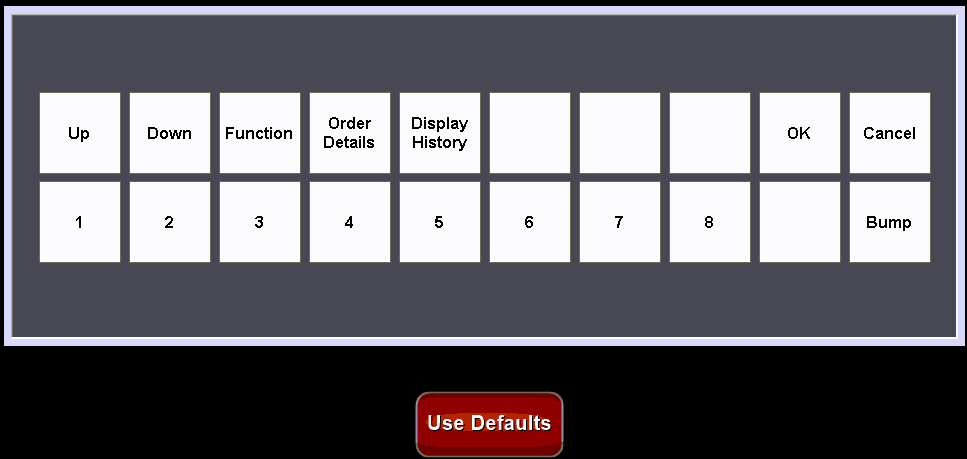
Select the button you wish to change and choose from the available options to program the button:
