Item Manager
The Item Manager is a graphical user interface where you can setup your menu items and configure them for assignment to buttons and flash sets.

The ![]() button located along the top of the screen allows you to automatically save your edits when switching to a new item. This should only be used by experienced users as no 'save' prompt will be seen and you may save inadvertent menu edits if you are not careful.
button located along the top of the screen allows you to automatically save your edits when switching to a new item. This should only be used by experienced users as no 'save' prompt will be seen and you may save inadvertent menu edits if you are not careful.
The ![]() button will blank out all of the screens 'friendly' descriptors and replace them with the base index numbers of the associated fields. This is for use by advanced users and is not recommended for casual menu editing.
button will blank out all of the screens 'friendly' descriptors and replace them with the base index numbers of the associated fields. This is for use by advanced users and is not recommended for casual menu editing.
The ![]() is where you setup and configure your menu items.
is where you setup and configure your menu items.
All Menu Items in PDQPOS use index numbers as their base identifier. Normally these index numbers are not seen during normal system operation but they are visible during menu setup and on some reports. Since Index Numbers are the base identifier for menu items you must assign one to each item in the system.
To assign an index number simply choose one from the list of open codes ![]() located along the left side of the screen. When choosing a code it is a good idea to keep your menu layout in mind. You should try to group menu items within 'item code blocks' if at all possible to make it easier to search for the items later.
located along the left side of the screen. When choosing a code it is a good idea to keep your menu layout in mind. You should try to group menu items within 'item code blocks' if at all possible to make it easier to search for the items later.
For example:
If you have 15 sandwiches in your store that are broken out into the sizes Small, Medium, Large you could add these into the system as:
|
Size |
Index Range |
|
Small: |
1000 -1005 |
|
Medium: |
1010-1015 |
|
Large: |
1020-1025 |
Adding the menu items in this way not only groups the items but also leaves gaps that you can use to add additional like items later. Leaving gaps of unused index item numbers will not negatively affect the menu in any way. Many stores will setup their menus with 20-30 spaces between item groups to ensure that they have room for future expansion and the ability to keep like items grouped.
The main section of the Item Details Screen is where you enter the majority of the item settings:

Item #: Chosen from the list of Open Codes. You can search for existing items if you know the item's number and enter it here.
Description: Enter a friendly name for the item
Group: Select this field to choose one of your menu item groups. Groups are used to set default options for similar menu items. For example, you can set all items to report as a catering item. Groups are configured in a separate section and will be explained in detail later in this guide. All items must be in a group prior to saving your edit:

Sales Category: Use Sales Categories to place your similar menu items into reporting groups. These are used for POS and above store reporting purposes. Sales Categories are configured in a separate section and are discussed in depth later in this guide:

Chain #: Chain Sets were discussed previously in this guide. Use this option to set a Chain Set for this item if desired. The default of 'No Chain' can be changed by selecting this field:

Force #: This option controls how many selections the cashier must make when following the configured chain. If no chain is selected leave this option at zero (0).
Special: The Special field determines what type of item is being added to the system. Select this option and choose the appropriate item type:
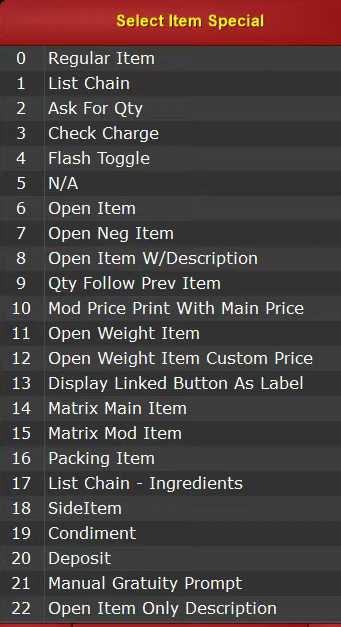
|
Regular Item: a Normal Menu Item with no special functions. Used for Main Items such as a Sandwich or Pizza |
List Chain: If a chain window is attached, it will add all of the items on that chain window to the order when this item is selected, instead of displaying the window and allowing you to choose |
|
Ask for QTY: prompts the cashier for a quantity when ordering the item |
Check Charge: Obsolete function, left in system for legacy purposes. Item will be treated as a Regular Item if this option is selected. |
|
Flash Toggle: Item becomes the toggle button for a flash set. Toggle button item must be created before the flash set can be built |
N/A: Obsolete function, left in system for legacy purposes. Item will be treated as a Regular Item if this option is selected. |
|
Open Item: creates an open item that can be rung up for any value. Used for items with prices that fluctuate |
Open Neg Item: creates a negative open item that can be used to enter any negative value. this is similar to an open discount |
|
Open Item W/Description: creates an open item that can be rung up for any value and prompts for an item description |
Qty Follow Prev Item: This item’s quantity will increase based on the quantity of the previous main item on the order. Useful for when you have a multi-item selection and want to duplicate all items in the selection without having to re-create the details. |
|
Mod Price Print with Main Price: Modifiers attached to this item will not display individual prices and will instead add their price to the main item’s value. |
Open Weight Item: Item will prompt for a weight value. Good for deli items or variable size items. Will adds the weight value to the item description. |
|
Open Weight Custom Price: Item will prompt for a weight value and a price per LBS. This will add the weight value to the item description. |
Display Linked Button as Label: turns the button to which into a label, which is just text with no boarder. Used to label sections of the menu |
|
Matrix Main Item: Used for main menu items to enable price matrix features (Matrix Items are discussed in the Matrix Setup section) |
Matrix Mod Item: Used for modifier items to allow assignment of a price matrix value. (Matrix Items are discussed in the Matrix Setup section) |
|
Packing Item: Designates this item as a “Packing Item” which is managed in the “Packing List” section of the menu manager. Packing Items can be designated to add to the order in a certain quantity when a specific item is added to the order |
List Chain – Ingredients: This option is not yet implemented. Item will be treated as a Regular Item if this option is selected. |
|
SideItem: Used in QSR Integration to designate an item as a 'Side' for proper VDU display. |
Condiment: Used in QSR Integration to designate an item as a 'Condiment' for proper VDU display. |
|
Deposit: Item will allow you to enter a Deposit amount against the open order. |
Manual Gratuity Prompt: Prompts for predetermined gratuity amounts |
|
Open Item Only Description: Allows an open item to only ask a description and no $ amount. Can be utilized to input data onto a check. |
|
|
|
|
Level: Used to associate the item with a Price Level. Price levels are used to set default prices for modifiers and are discussed in depth elsewhere in this guide. Toggling the ![]() button will remove this item from the 'Item Level Setup' screen and make it unavailable to assign item levels. This will not remove any existing item levels.
button will remove this item from the 'Item Level Setup' screen and make it unavailable to assign item levels. This will not remove any existing item levels.
These item levels can be activated for individual order Transaction Type types by the technical support staff as there currently is no way to activate these prices within the customer interface:

Smart Coupon Link: Links the item to a Smart Coupon. When ordered will allow the linked coupon to be selected and used. Smart coupons are setup in the Coupon Manager and require the 'Allow Menu Item Link' option to be enabled:

UPC: You can either manually enter or scan a UPC bar code and link it to the item that is currently being edited. This will allow you to use a bar code scanner to ring up the item from the cashier screen.
 Auto Guest Cnt: The Auto Guest count field adds the ability to track guest count based on items ordered. for example place the auto guest count to '2' on the Menu Item 'Dinner for 2' and the guest count for that order will be set to 2 automatically without relying on the server to enter it.
The Guest count can be updated from the ordering screen using the  button.
 The Allow Service Fees options let's you select if the menu item is exempt from any service fees you may apply to an order.
Price 1-7: Similar to the 'Level' function these price indexes allow you to set alternate item prices for the selected menu item. These item prices can be activated for individual order Transaction Type by the technical support staff as there currently is no way to activate these prices within the customer interface.
Item Price 1 is the default menu price.
COG: Enter the 'Cost of Goods' price for the item for use in above store accounting.
Tax Rate: Choose the appropriate tax rate for the item. Tax rates are setup on the Tax Rate screen. The Ohio tax rates are setup automatically and are not editable. The Ohio rates designated -1, -2 and -3 used for take-out and To Go orders in Ohio and should not be chosen unless applicable to your location.
On the  tab you can enter a description of the product for the cashier. This description can be accessed by selecting and holding the menu item on the ordering screen to receive a pop-up window. This pop-up window will contain the product description entered here and can be used to describe how the item is prepared or present a list of toppings.
